Monday, April 30, 2012

Turquoise Lovin' #36

Happy Tuesday!!  It's time for turquoise lovin' again.

Hope your week has been sweet and full of sunshine.

I was so excited by all of the fun talent that was linked up last time.

You ladies are awesome as always.

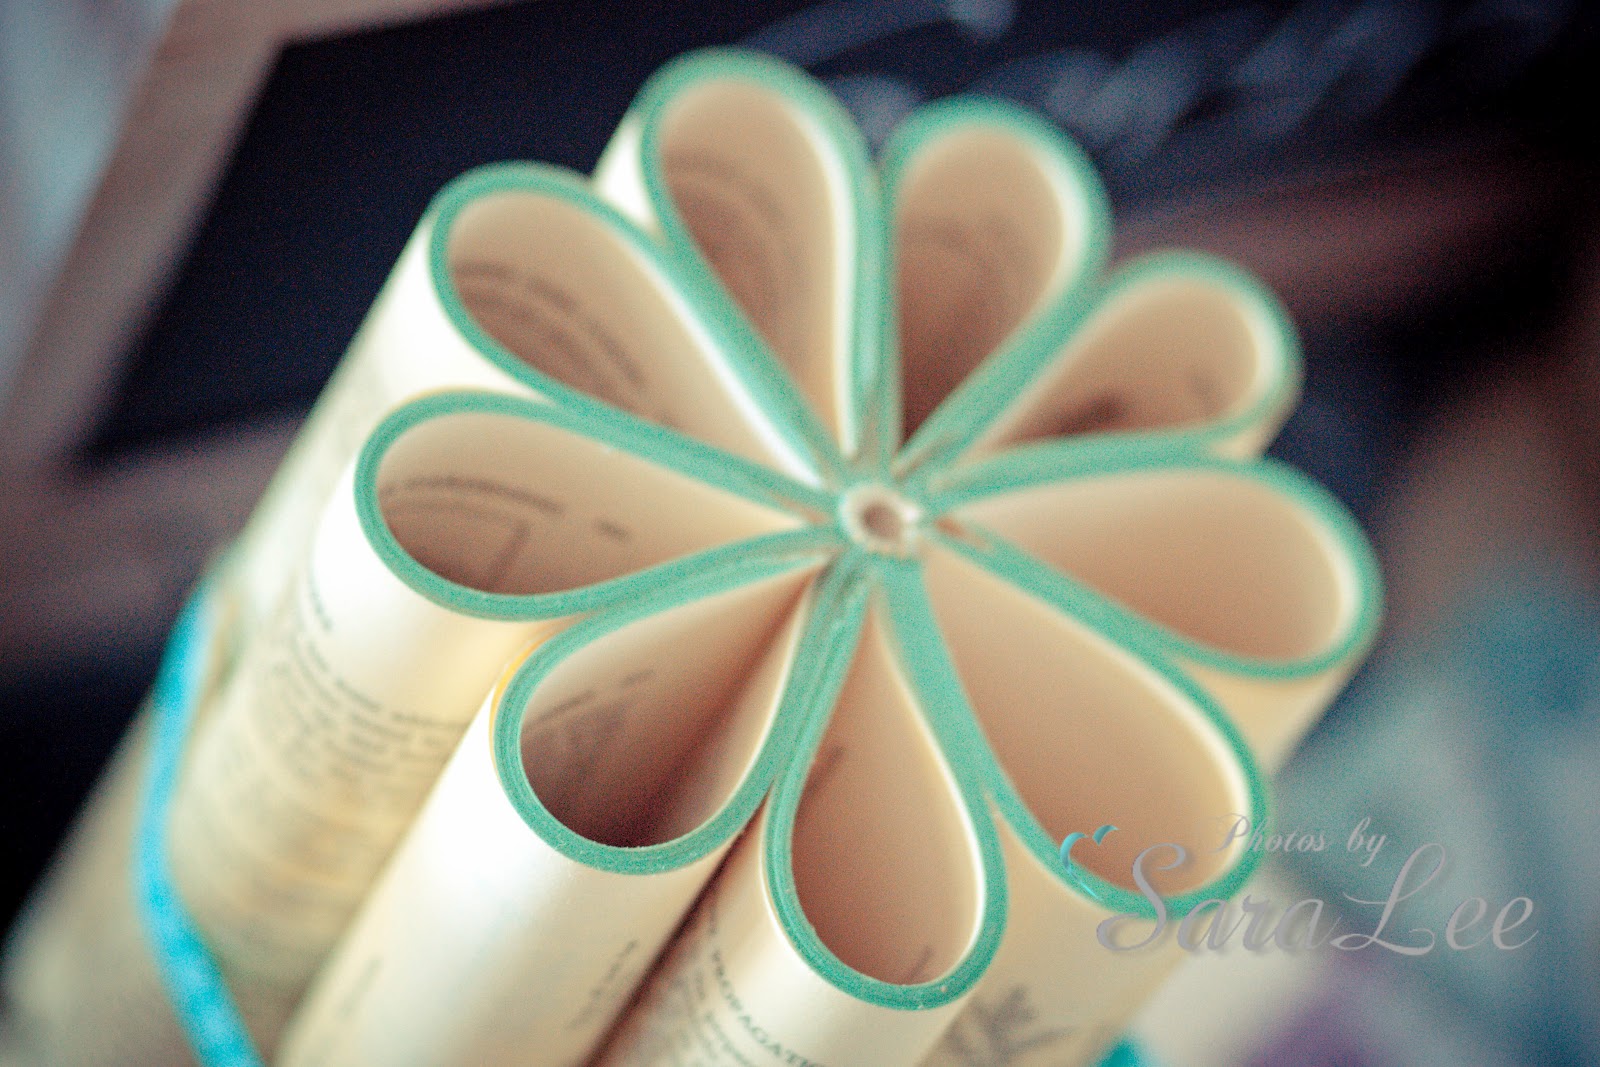
Hope you get a chance to check out my fun vintage book flowers.   They are kind of unique and cool and cheap to make also!

Here are the features of the week.

Love this painted utility rug from Vixen Made.  


Darling Animal silhouettes Wall Art from Mae Armstrong Designs...cuteness!!


Adore this creative memo board from an old door from The Space Between!!  How fun!!


And this flower art is so gorgeous from Creative Passage


Ok, it's time to party!!  Time to link up YOUR projects from the week!!

Party Rules...
1) Please follow Sweet Little Gals
2) Link up your turquoise/red projects at the top linky...anything else in the bottom linky. Excited to have EVERYONE join from now on! We'll still feature a couple of your turquoise projects every week...
3) Try to comment on at least two other posts.
4) PLEASE grab a turquoise lovin' button on the sidebar so you can share the turquoise fun with others.
5) No giveaways or shops please.

Enter all of your TURQUOISE  projects here... 


 Enter all OTHER PROJECTS here... 


Sunday, April 29, 2012

A Touch of Vintage #3 {Vintage Book Flowers}

Back for #3 of A Touch of Vintage!!  I've been having a lot of fun searching for vintage stuff and can't wait to show you my project for this week.


I found it in the Easter Issue of Celebrate, my new favorite magazine.

I'm so excited about these I can't contain myself!!  

So here they are,  
Vintage Book Flowers

I just love how unique they are, and oh SO vintage!!


Here's how I made them.

First you need to get some cheap used books and remove their covers. Be sure to leave the spines intact.


Then follow these directions to finish the flowers.

Step 1:  In groups of 20 to 25, tuck the pages towards the spine of the book, working all of the way to the end of the pages creating the flower petals.


Step 2:  Tie some fishing line (or I used crafting wire) around the flower to hold it together.  This part required hubby help for me, it was kind of impossible to do by myself.  He held the flower while I tied!!

Step 3:  Spray paint in your desired color.  I used two or three coats to get my desired color.  Allow to dry.

Step 4:  After flowers are dry, tie ribbon around the flower to conceal the fishing line.  

Note:  For the varying heights, I brought my books to the local print shop and had some of them chopped in half.  They look at you kind of funny when you ask to chop books in half but it's worth it and not too much to pay.  Ha!

Here's some more pictures of them {overload, I know}


You can use the flowers in a centerpiece or whatever else you'd like to decorate with them.
They're pretty versatile.

A very simple and fun project.

Remember, you are welcome to link up your vintage projects too.

I would LOVE to see them.

Thanks for joining me for another


Tuesday, April 24, 2012

Turquoise Lovin' #35

Happy Tuesday!!  Hope you are all having a lovely week so far.

I've been having fun with my new themed days here on the blog.
Mondays I am doing A Touch of Vintage and Thursdays I am doing Specially for Kids.

So far I've made a fun Crayon Canvas and a Retro Tray Redo.  Two absolutely fun and easy projects!

It's fun to have a theme and helps me stay focused.  Hope you can come by and visit sometime.

There's going to be a lot of fun stuff going on!!


Now, on to the features for this week.

Check out this awesome Medical Party at Vixen Made  Isn't it adorable and unique?


 Talk about ADORABLE fabric covered boxes for a craft room at Rae Gun Ramblings.  
I need some of these in MY house really badly!


And I love this office turned closet at The Late, Young Family.  How fun is this?


 Ok, it's time to party!!  Time to link up YOUR projects from the week!!


Party Rules...
1) Please follow Sweet Little Gals
2) Link up your turquoise/red projects at the top linky...anything else in the bottom linky. Excited to have EVERYONE join from now on! We'll still feature a couple of your turquoise projects every week...
3) Try to comment on at least two other posts.
4) PLEASE grab a turquoise lovin' button on the sidebar so you can share the turquoise fun with others.
5) No giveaways or shops please.

Enter all of your TURQUOISE  projects here...


 Enter all OTHER PROJECTS here... 


Monday, April 23, 2012

A Touch of Vintage #2 {Retro Tray Redo}

Welcome back to A Touch of Vintage!!  I'm always SO happy when you stop by.


This week I want to share a fun retro tray redo I made.

I had recently gotten a cute VW Bus Print from Lemonade Makin' Mama.

And I love it.  So I decided to spiff it up a bit. 

We used to have a Volkswagon bus growing up and there's nothing quite like 'em.  
{If you've ever owned one, you know what I mean}

Ours was pretty much always breaking down except for when my Dad was along...ha!!  

But it was so stinkin' cute

And now I wish I had it so I could redo it for photo shoots.  Ya never realize what you have till it's gone.

Retro Tray Redo

I ordered a fun plastic tray off of amazon for this project.


Then I used spray adhesive to stick the retro bus print to the tray.  I put some washi tape around on the handle and the top of the print to give it some flair.

Then I took some retro styled fabric, cut it in strips, and then tied it in knots.  And I hot glued the knots to the bottom of the tray.  I also tied a few knots to the top handle of the tray.

And then I used a strand of thick twine to make a hanger.

Pretty simple and super easy.

I love how it turned out!!  It's kinda fun and cool too.


And there it is.  Retro, vintage, a little a lot hippy, and a whole ton of fun!

Oh and remember, if you'd like to, you are welcome to share your recent vintage projects here in the linky as well.  I love to see everyone's projects. 

Thanks for joining me for another


Wednesday, April 18, 2012

Specially for Kids #1 {Crayon Canvas}

That's right.  This one's gonna be ALL about kids.

Specially for kids. My kids.  Your kids.  Everyone's kids.
All about fun.  All about kids.

Once a week {on Thursdays, unless I feel like putting it on another day, which I've already done!} I'm going to be posting something ANYthing fun that's related to kids.  And once again it's going to be easy-peasy going.  Just like me.  Ha!

{Cue hilarious laughing}

It might be about kiddo snacks, crafts, games, projects, ANYTHING related to kid stuff. 

OR if I get stuck in a rut I may just share fun kids stuff I have found around bloggy land.  Or Pinterest.
Cuz' that's the way I like it.  Who says blogging can't be simple AND easy?


This week I'm going to share a project I've been wanting to do for a LONG time.  I'm sure you've seen it, and maybe you've even tried it.  But it's pretty fun and cool looking too.

This is such a fun kiddo project, they will thank you for letting them do it!

HA!

{I found this project on Pinterest, but here is the original site with the tutorial}

Here's how I did it.

Crayon Canvas Project

I started with a 16 x 20 blank white canvas that I ordered on Amazon.
Then I took a box of crayons and lined them up at the top of the canvas in rainbow colors and glued them on with hot glue.

Note:  I used only the brighter colors and kept out the blacks and browns to keep it bright and fun.


Then I took my blow dryer, turned it on low heat, and ran it across the bottom sides of the crayons till they started to melt.

I must confess, this part is a bit tricky!  You may have to experiment for awhile so that you can get the hang of it.  Also make sure you put the canvas on towels when you are using the dryer...the colors will spray just a little bit a lot.

Melt the crayons until your canvas looks the way you want it to.  It took me about ten minutes of melting to get it how I wanted!!


Isn't it way cool?  I love this project!!


I definitely didn't get it perfect, but I like it and that's what counts right?  This project is so much fun I think I'll do another one! {I have five more canvases in the house!}


\


Hope you come back next time for Specially for Kids
I would love to hear about some of your kids projects that you have been working on!


Link Within

http://www.mysweetlittlegals.com/feeds/posts/default?alt=rss